

How To Make Skin Realistic
Greetings, everyone! This article will show y'all how I arroyo creating faces for real-fourth dimension characters and present them using Marmoset Toolbag 3. I hope this commodity helps those who are looking to learn how to create skin materials inside Toolbag.
Sculpt
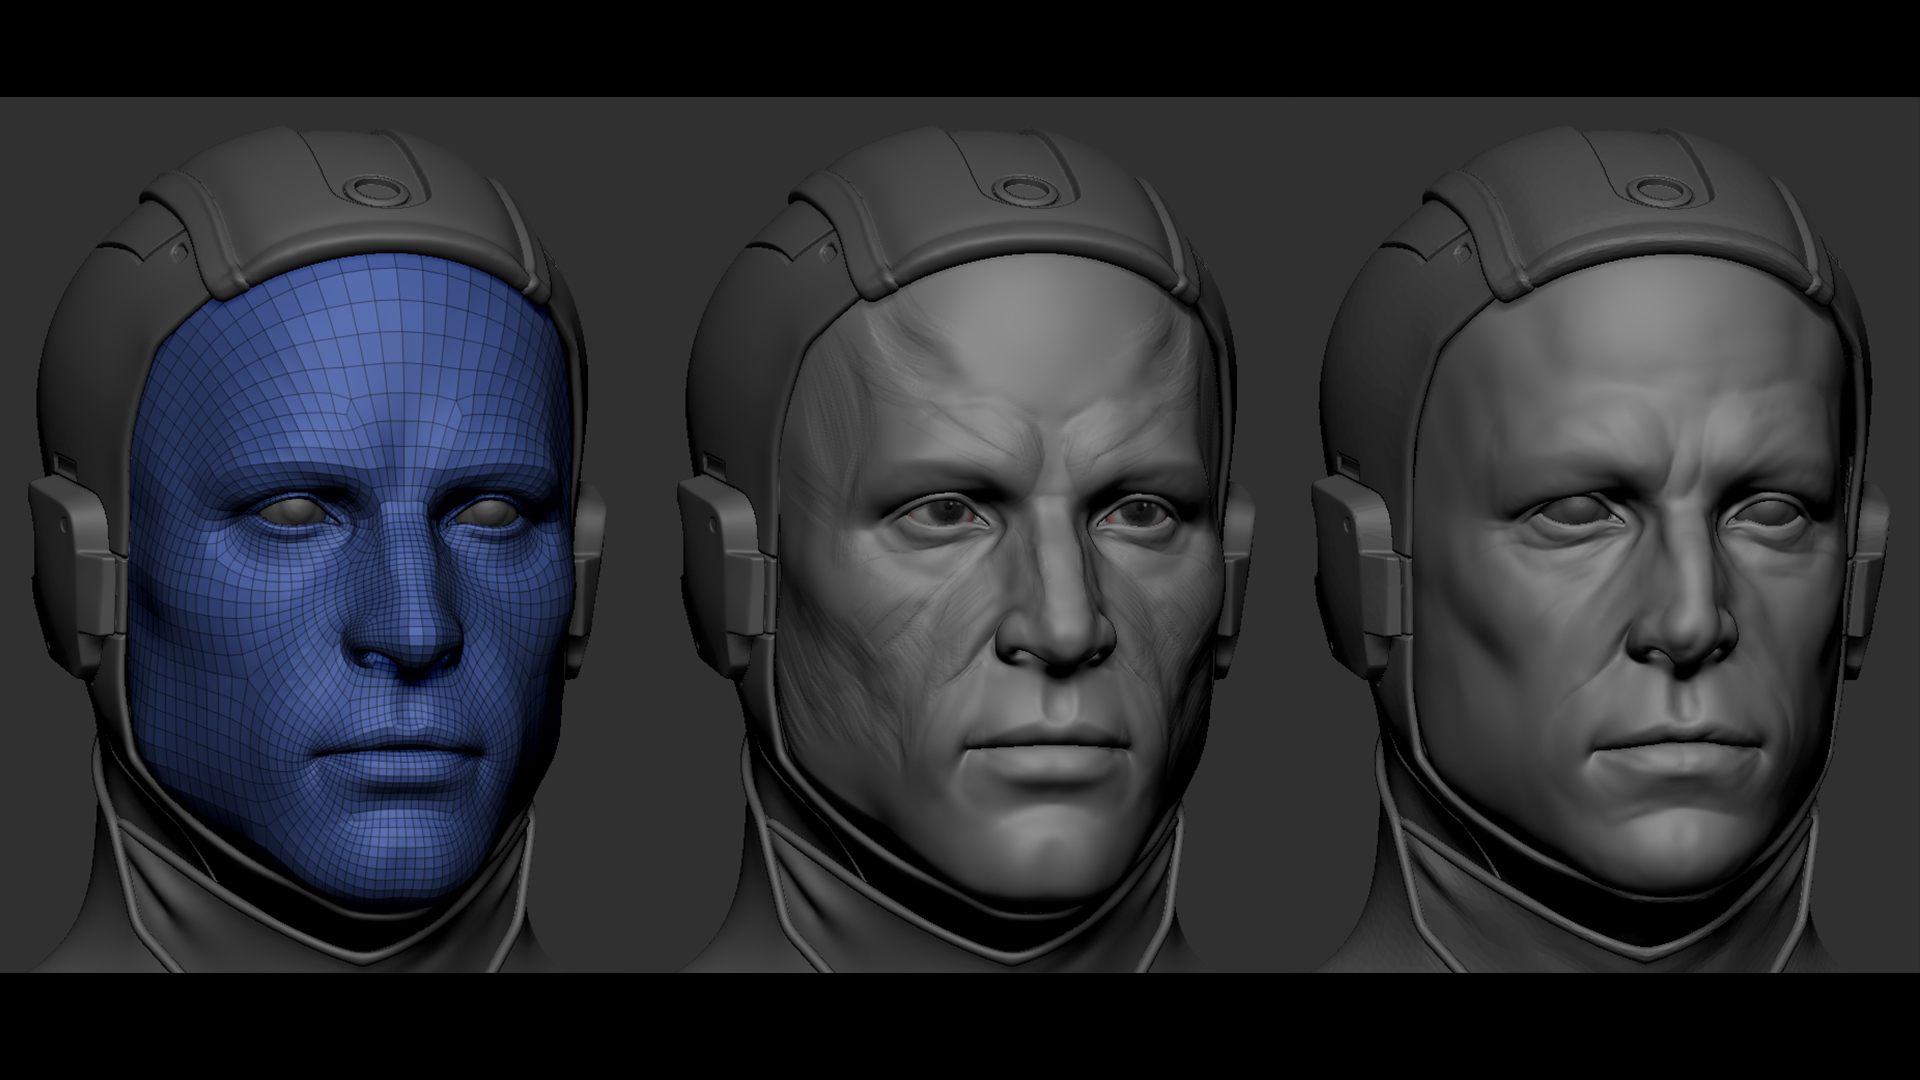
The focus of the commodity is aimed towards texturing and setting up shaders, but there are a few things I want to cover beforehand which I think help a lot in the final result.
I kickoff sculpting using a custom made base mesh which has right topology and UV's that tin can exist used for the low poly mesh. This cuts downwards a lot of time. The sculpting process is straightforward; find good reference, have a strong foundation in anatomy and become crazy until it looks adept.
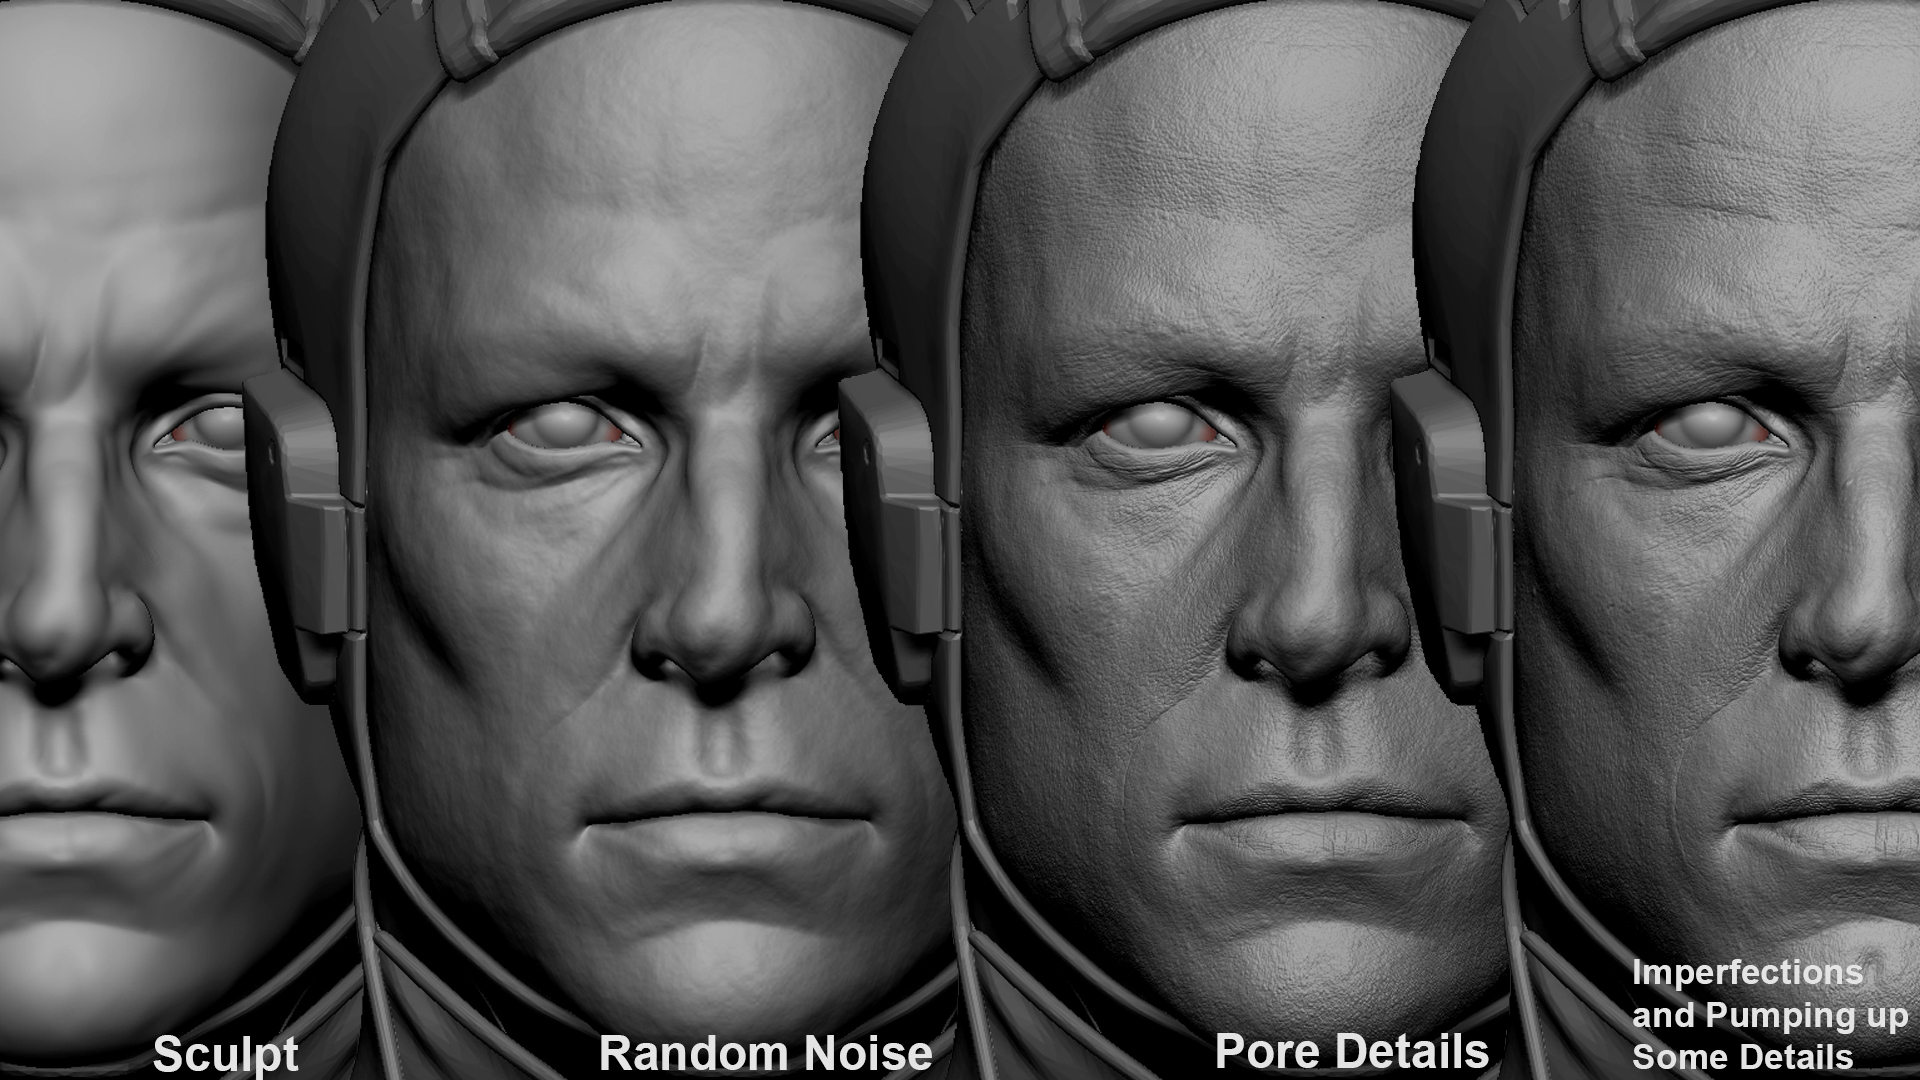
Lately, I've been using texturing.xyz for my pore details. Sculpting pores by hand (dragging alpha) is easier and information technology doesn't make much of a departure for games/ real-time character creation unless you zoom in existent close. The choice is yours.
Tip: Adding subtle noise in skin helps to breakup the "perfect" feeling and makes it wait more organic.
Textures

The texture maps I used were:
Normal, Detail Normal, Detail Weight, Roughness (inverted Gloss), Albedo, Translucency, AO, Cavity, Racket, Specular (Optional) and Scatter (Optional).

Albedo: Albedo is color information. For this project, I projected albedo data from texturing.xyz. Beneath is my process for how I projected my albedo map. Another selection to achieve a like outcome would exist hand painting your textures (Magdalena Dadela'due south GDC tutorial demonstrates this actually well). While hand painting is fun, it's more time consuming compared to working with scan data.
One useful tip to help heighten the feeling of subsurface scattering in your albedo map is to paint veins and redness effectually high claret flow areas like the nose, ears and cheeks. Make sure to go along the colour shifts subtle. Multiplying your crenel map down as a red color helps faux the subsurface consequence and helps marshal the pores in both the normal and albedo maps.
Cavity: Cavity maps tin can be used in multiple maps, such as Albedo, Specular and Roughness. It's simply a black and white map where the pores are completely blackness. Marmoset have added Cavity maps to Toolbag 3's baker which works actually well. The method I personally like to utilise is extracting cavity detail from ZBrush since it'southward faster than blistering. Even so, for this you'll need to have the same UV's for both low and loftier poly meshes.
In ZBrush, fill up your mesh with a pure white color then go to Tools > Masking > Mask by Cavity. The default values should work but fine. If non, play with the bend contour to become better results. Lower the blur values a bit, since ZBrush'due south default values are likewise intense. Y'all can modify this under Preference > Transpose > Mask blur strength. Invert the mask and make full it with black, create a texture and export.
Normal: Bake downwardly your high poly mesh onto the low poly mesh.
Translucency: This defines how much calorie-free scatters through the surface. Brighter values on the map ascertain thinner areas such as the ears, tip of the nose, nostrils, eyelids and lips. The map can be derived past inverting the thickness map baked from the loftier poly. I tweak the nose area on the map to brand it more than intense and give it a more fleshy expect.
Roughness: Personally, I feel this is the most artistic map in terms of how they're constructed. Every artist has their ain methods, simply the basic principles remain the same.
- Have a base grey value that defines how rough/sleeky the confront is in full general.
- Paint unlike values in specific areas of the face that are rougher or smoother.
- Pore details should be rougher, they shouldn't appear shiny in engine.
- Have big breakups in value which are really subtle. This isn't realistic, simply it looks good when the light moves.
- Paint unlike roughness values for scars, wounds, dirt, sweat, etc.
1 and 2 are the major points. I've seen people just use one for stylized faces. 1, 2 and iii piece of work actually well and 4 is an experimental 1 I've seen people practise, but it looks good when lights motility. 5 is subjective to the project you're working on. And this is what I meant by the Roughness being the near artistic map, you use your own creative judgements and arrive await good.
Below is an example of how I commonly construct my roughness maps. This map used all the methods above and the new face up was created with A and B. The construction of Roughness maps vary from projection to project. In Toolbag, a value of 0.45 Roughness value works well as a starting bespeak.
Besprinkle: Besprinkle maps describe the colour which bleeds at the transition point from low-cal to shadow. A apartment peach colour works pretty well for realistic skin, and it tin be obtained by fully saturating the albedo map. The texturing.xyz data I used is extracted from the subsurface value of skin, then saturating that gave me realistic values.
Detail Normal: This tiny, tileable normal map helps make your textures look more detailed than they actually are. Substance Painter includes a few detail maps in their library that tin exist imported into Toolbag. For this project, I used Skin_bumpy. If y'all don't own Substance Painter, you can find a good detail map past Yuri Alexander available for download from Marmoset's Grapheme Setup folio.
Detail Weight: This is a blackness and white map which determines where the detail normal map will be practical. Blackness being the identify where at that place is no issue. The lips have specific pore information, so yous don't want tiled pores there. Y'all can have some of this applied to the tip of the olfactory organ and the bottom of the eyelids.
Dissonance: This map is used to assistance the fuzz wait better.
Skin Material
![]() Download Toolbag Scene
Download Toolbag Scene
Toolbag 3 handles skin shading similar a champ. The cloth is easy to construct and looks astonishing. At that place are no verbal values for skin that brand information technology look realistic as it varies from project to project. With that said, there are a few values that work actually well every bit a starting point.
- Specular: 0.027
- Roughness: 0.45
Earlier starting anything in Toolbag, brand sure the scene calibration is properly set. Use Testify Calibration Reference to ask a gentleman for help and friction match the scene scale. Below is a demo of how I set my up skin fabric inside Toolbag.
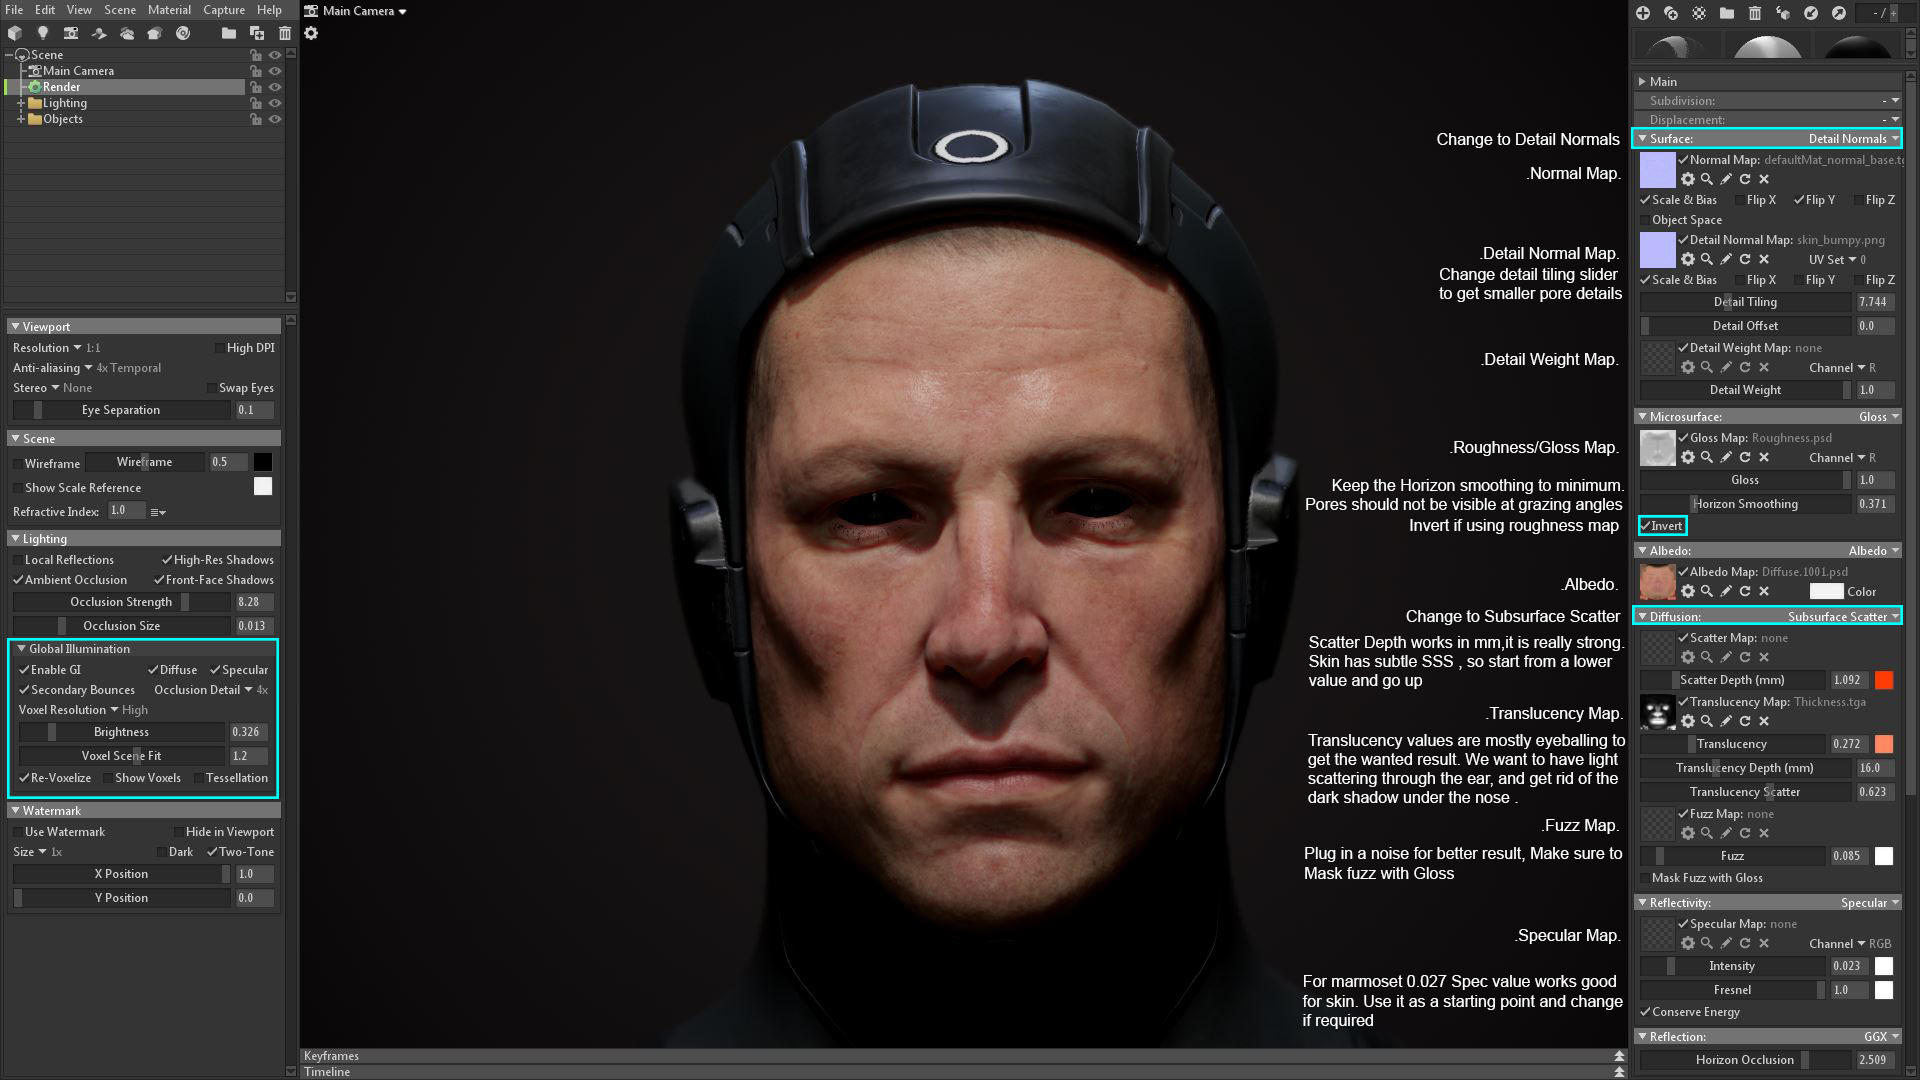
In that location are three important aspects to go on in mind for peel shading:
- Specular
- Subsurface Scattering
- Global Illumination
All of these components are fundamental to setting upward a practiced skin shader. A common problem for skin in CG is the lack of light bounceback from different parts of the pare. GI helps to reach that event and gets rid of the AO created past the engine around the corners of the nose, lips and fatty above the eyelids. It also helps with translucency.
AO helps ground the eyeball on the face up. A loftier strength setting and modest size mostly works. For GI, start with a low effulgence and adjust upwards. You lot want to get rid of the extra AO and darkness around the optics, corners of the olfactory organ and where lips meet. Make sure not to make the GI too intense, every bit it makes the pare wait emissive.
SSS in Marmoset is composed of Scatter Depth and Translucency. Scatter Depth describes how fleshy or waxy the surface is. A flat peach color works fine for realistic skin. You should look for a subtle transition from your shadow areas to pare. Translucency defines how much light scatters through the surface. Place a light behind the ears and the side of the nose and tweak the values that work for your scene. The effect should be subtle with calorie-free passing through the skin.
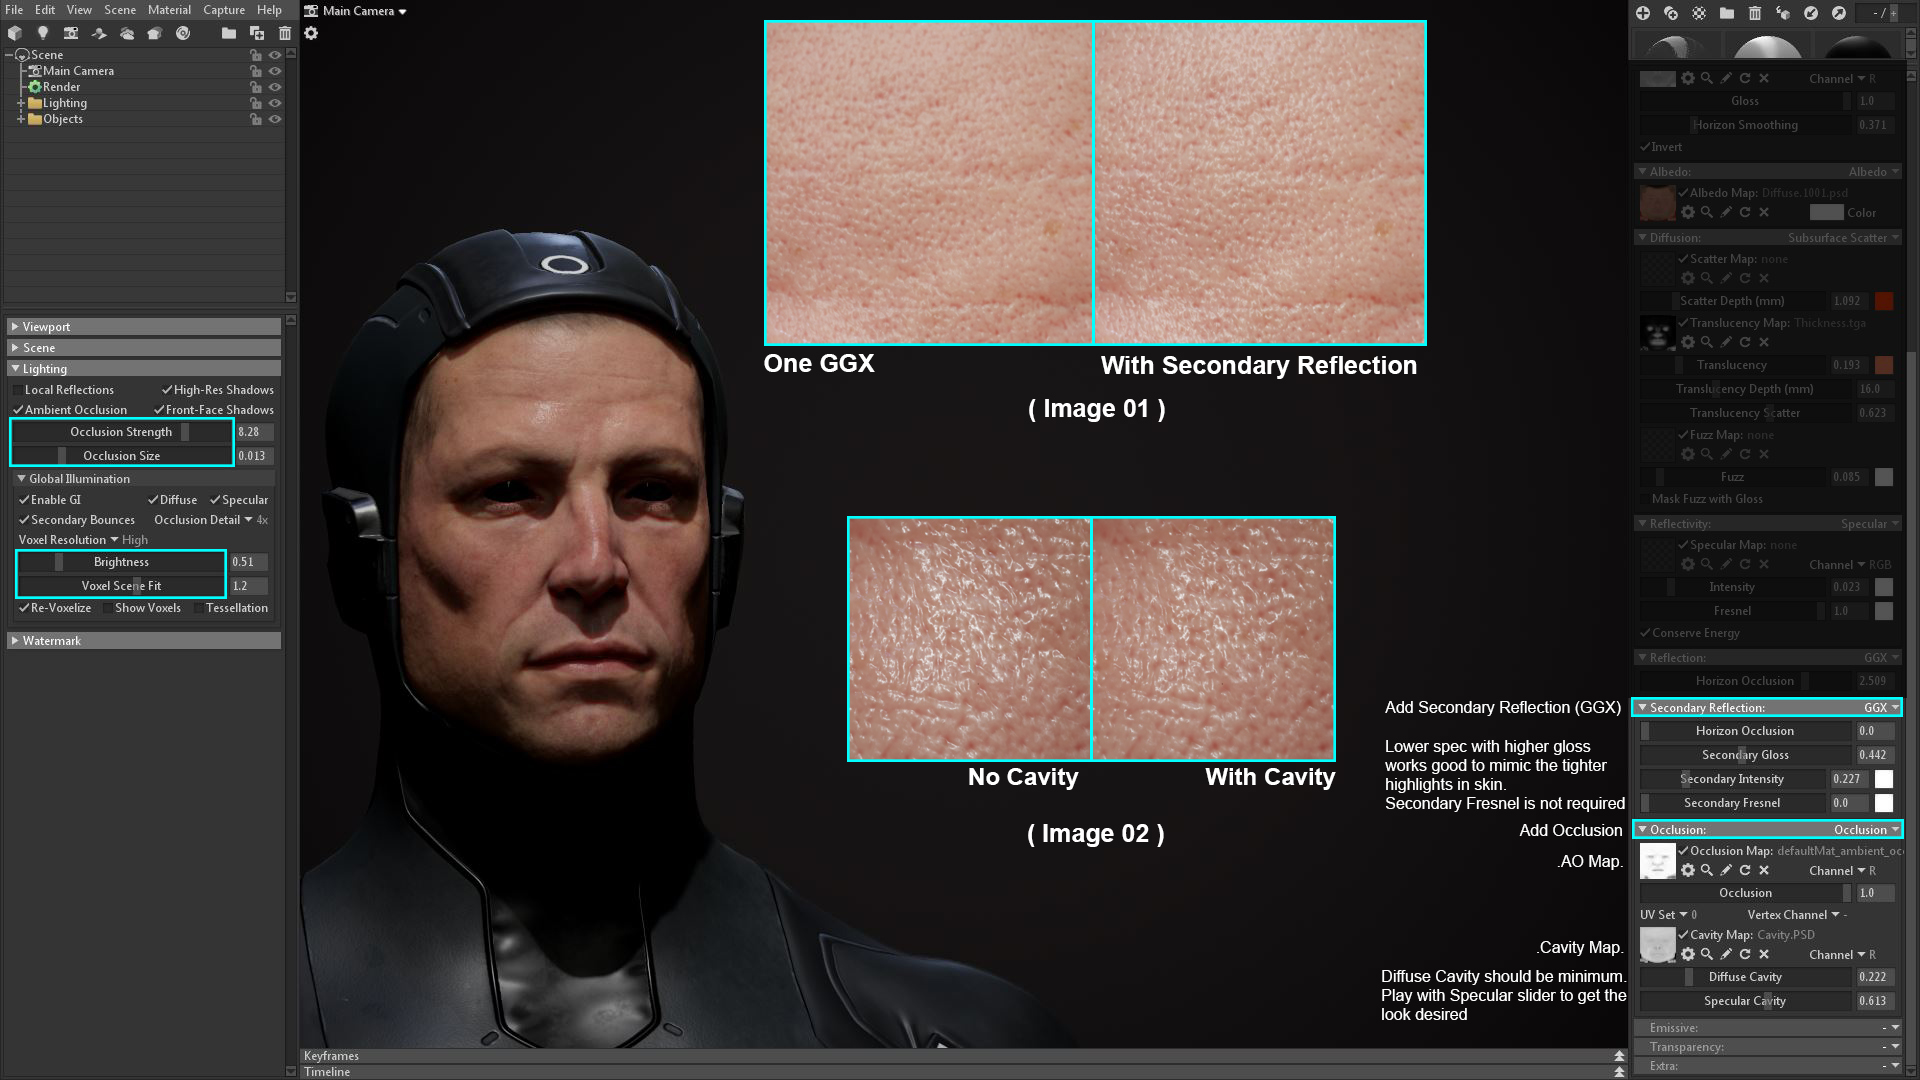
A specular value of 0.027 is a good start for skin. Skin has two specular layers instead of one, which makes for better rendering. The Secondary Reflection helps achieve extra spec and gloss around the highlights to mimic the oily surface of the skin (Prototype 01).
Adding a cavity map helps remove specular reflections inside pores non-destructively. It tin be baked into the specular map, simply having a slider is much more flexible. It too helps salvage any pore details that are blurred past the SSS (Epitome 02).
Peel is all most subtleties. Find skillful references and try your best to match them while making sure it looks adept under every lighting condition.
Eyes
The window to the soul.
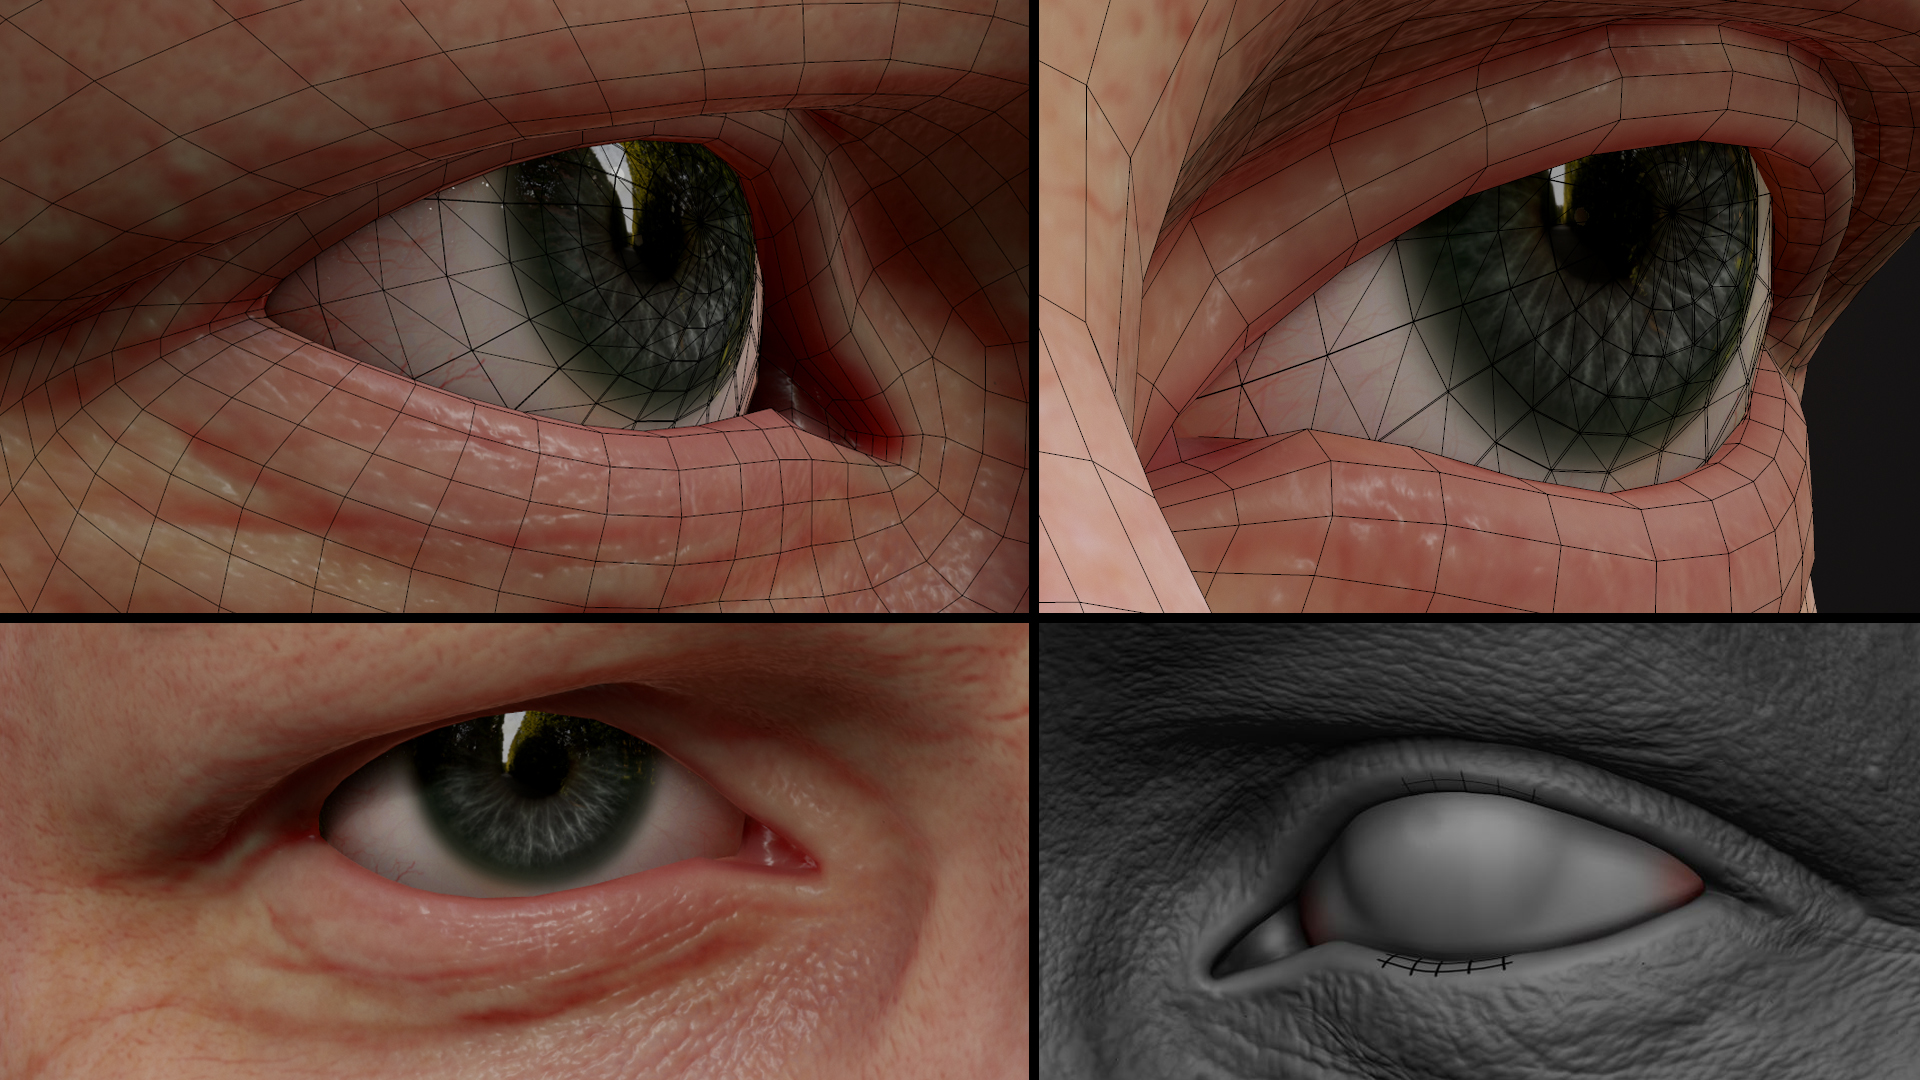
One thing I care a lot nigh and endeavour to constantly improve is eyes and how the eyelids collaborate with the eyeball. Make certain they are thick and hugging the eyeballs in both the high and depression poly meshes. This helps make the eyeball feel more integrated.
Marmoset have recently added Refraction to Toolbag, simply it does break on occasion and is not every bit complex as Unreal'south (Unreal has the prettiest CG eyes I've seen withal). But don't sweat information technology, I have you covered. There'south a simple however constructive way to brand realistic optics in Toolbag. The method was originally developed by Peter Zoppi in his tutorial for eye cosmos, which I would highly recommend getting if you lot want more detailed instructions.
Geometry and Baking

The all-time fashion to fake refraction is to broil the geometry of the eyeball. To do so, make sure your low poly has a cornea bulge that's duplicated and convexed inward to form the pupil. Smooth the high poly mesh and bake it downward to the low poly. The cornea and eyeball are role of the same low poly mesh and share the same UVs, simply they volition take different maps.
Maps
After baking, the procedure becomes straightforward and you can texture the middle however you lot want. One thing that volition help brand your refraction better is adding a parallax map. It'south a flat white map and a blackness colored pupil with gradient borders.
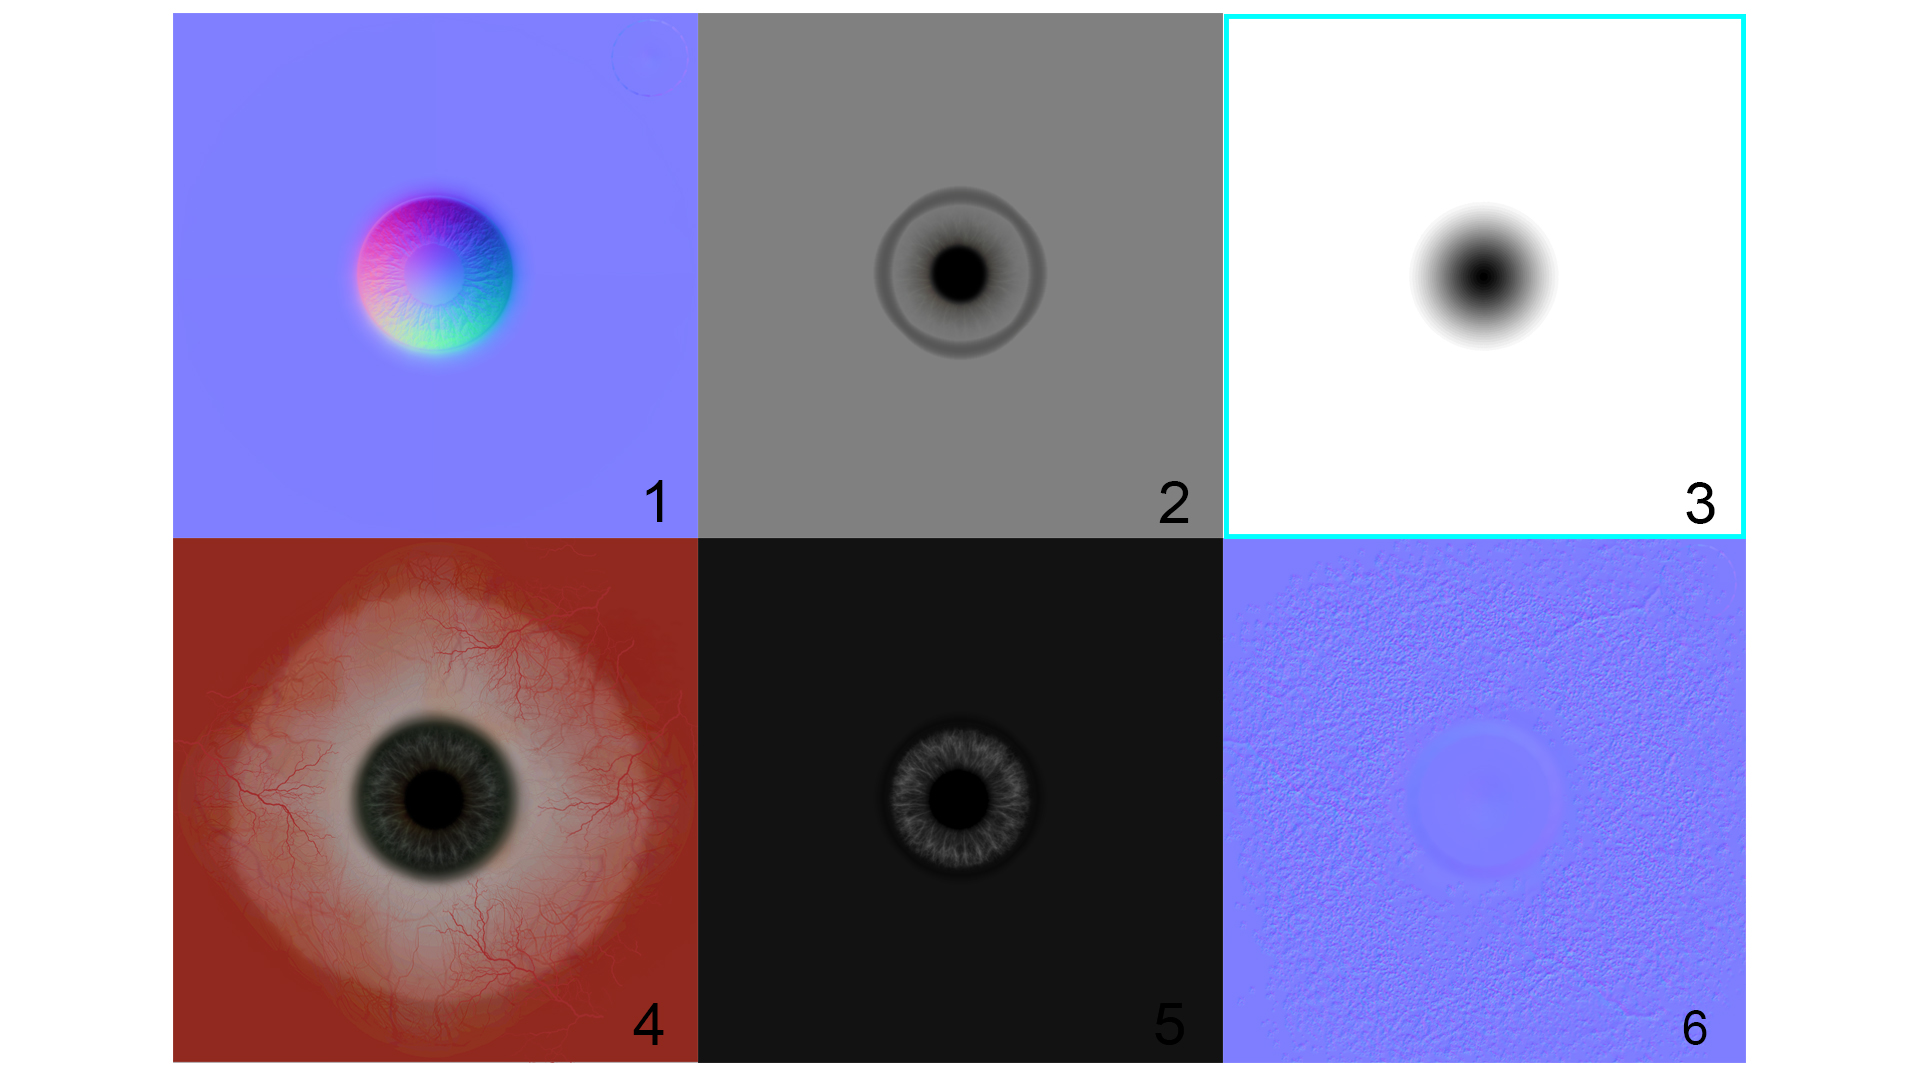
- Eyeball Normal
- Eyeball Gloss
- Parallax
- Eyeball Albedo
- Eyeball Spec
- Cornea Normal
The normal map for the eyeball should take the iris details and the albedo should include the color of the iris, eyeballs and the veins. The normal information of the veins should come from the cornea's normal map with noise practical to give it a more wet wait. Notwithstanding, make sure not to include whatsoever noise in the in the cornea bulge. Specular and gloss maps vary from project to project.
Middle Material
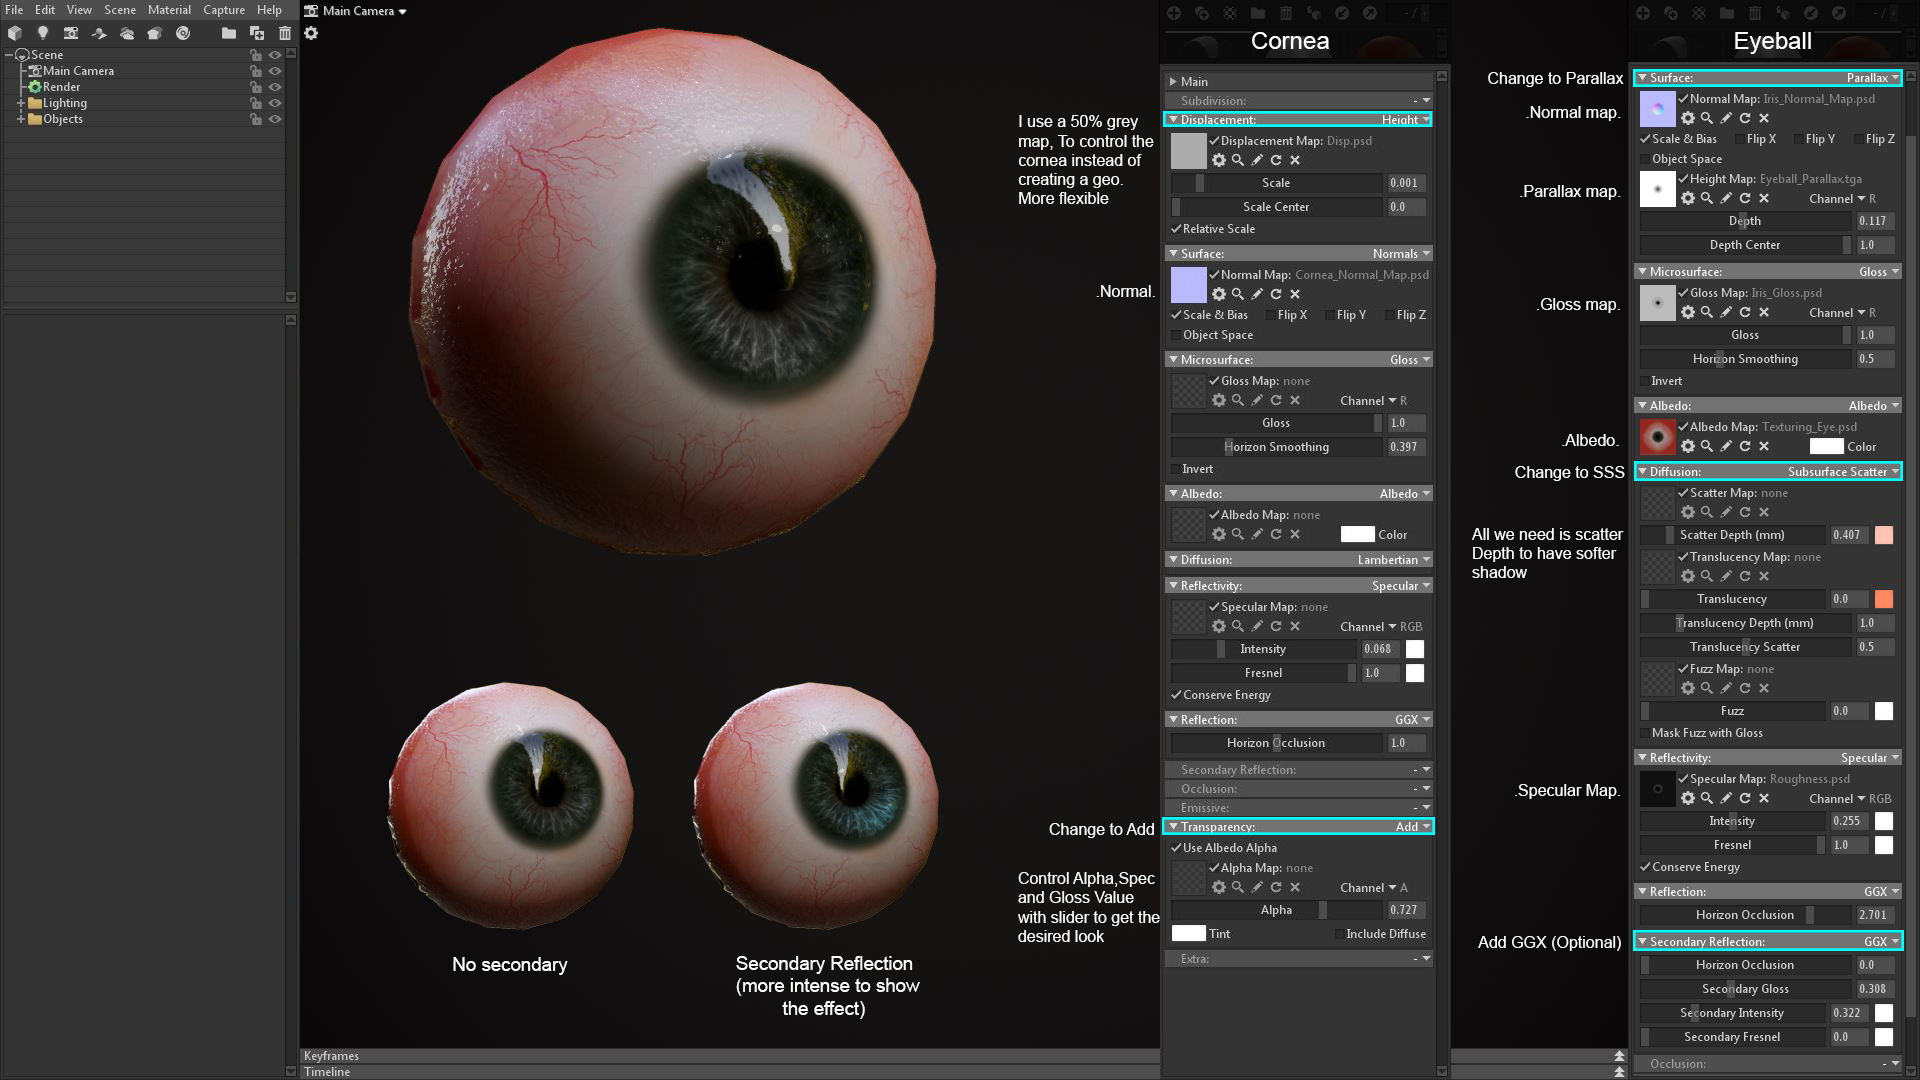
Tip: I've seen people apply Photoshop to enhance the contrast in the optics on the reverse side of where the lite is hitting the eyes. The same result can exist accomplish using secondary reflection. It can make eyes more attractive, but it tin look overly stylized. Use your own sentence and apply information technology if it works for your project.
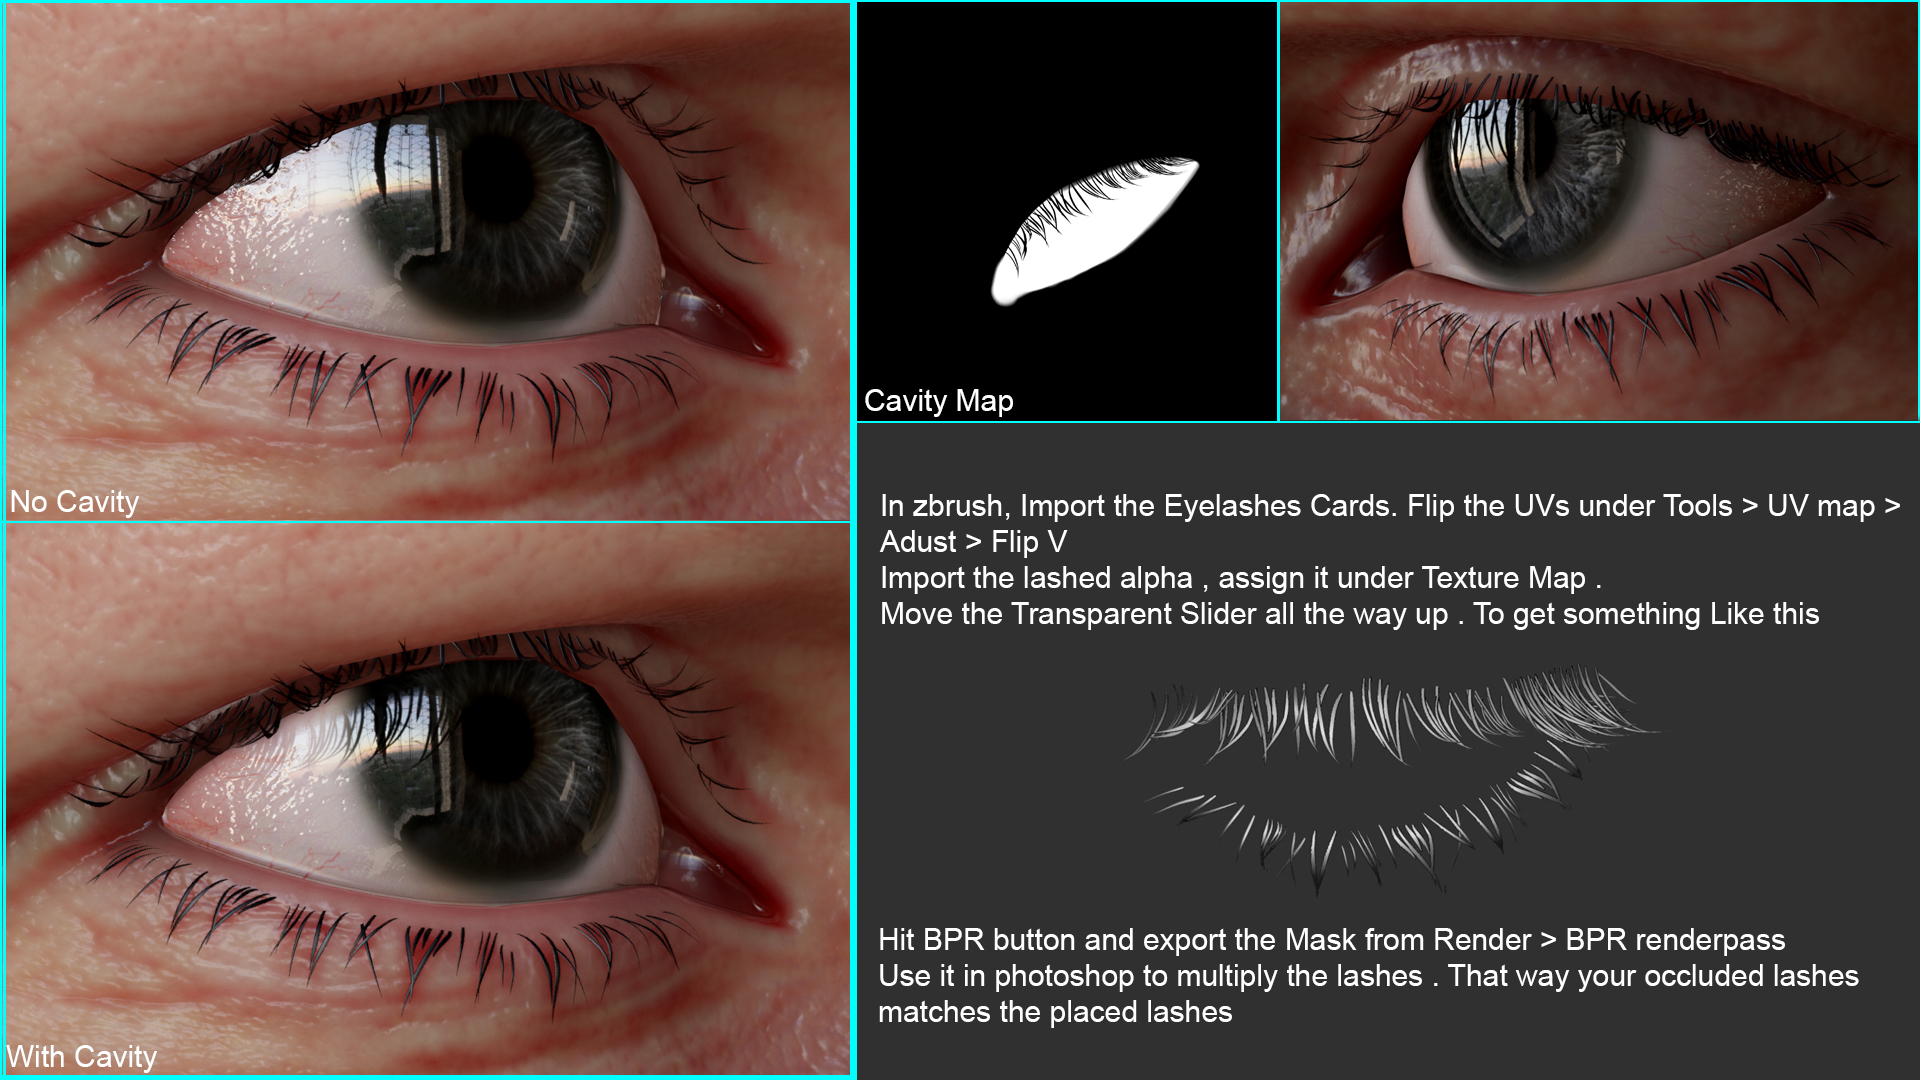
Lashes and Wet Line
The lashes are hair cards that are placed by hand and the wet line is a mesh blending the eyelid and the eyeball together with additive transparency applied. Setting the reflection to Anisotropic instead of GGX helps sell the result. Alter the direction so the highlight follows the management of the geometry when the light moves. The wet line is something I'm still experimenting with and I haven't found a practiced medium which works in every situation.
Lashes Occluding the Spec
While writing this article, I realized something was missing from my heart setup. It's a minor change that makes a major difference; lashes and lids occluding the spec in the eyes. This is a common problem for real-time rendering, as the lashes are equanimous of cards and neither GI nor AO assist to achieve this effect. Again, don't sweat it, I accept you covered. It does feel like something might interruption when the eyes are blithe, just for however images, this works fine.
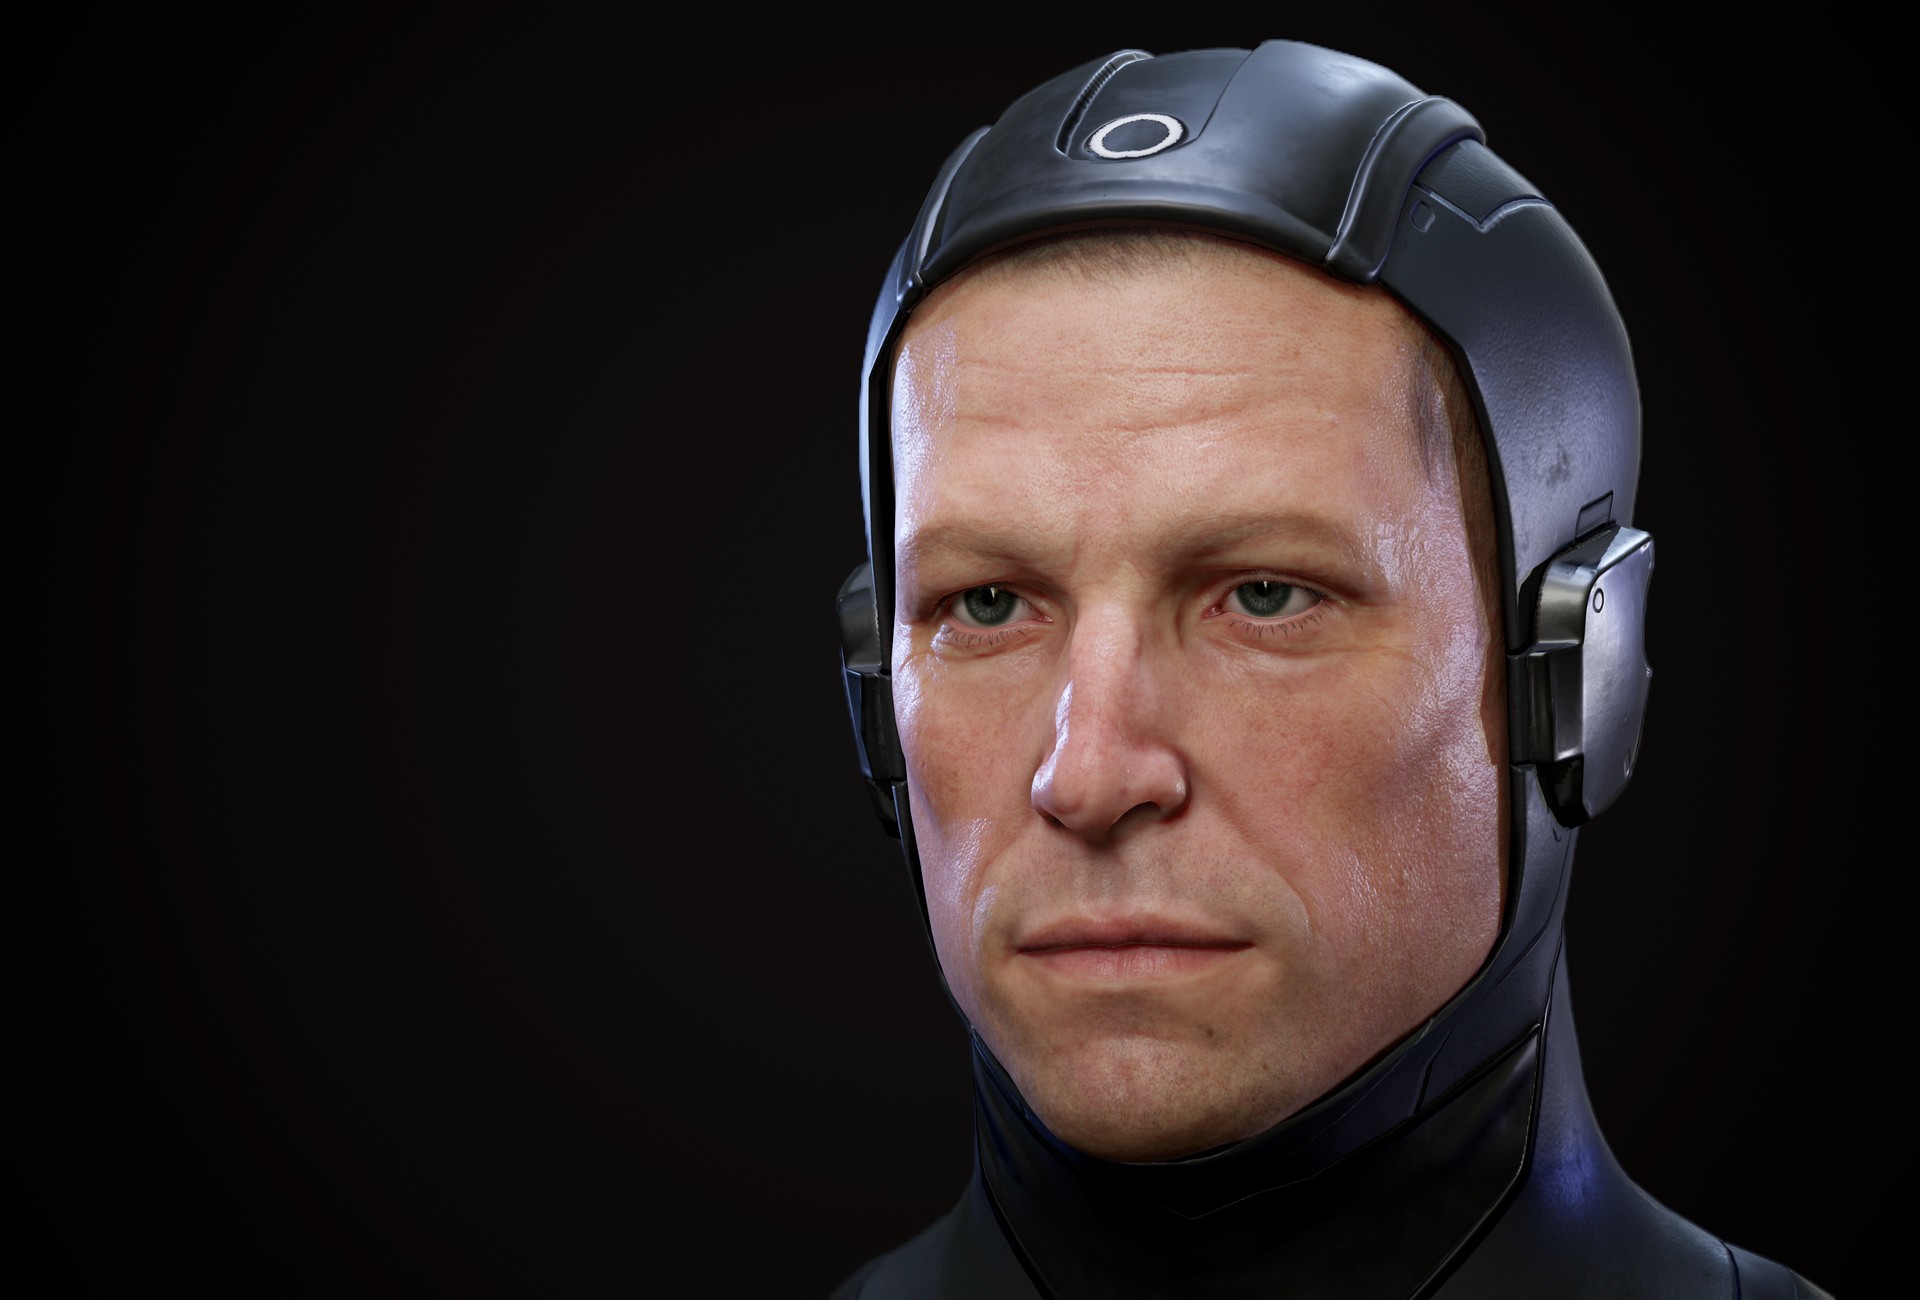
Lighting and Presentation
Lighting

A skill I've neglected, and now I regret it. Yous tin can create an awesome sculpt, perfect texture maps, simply if you're not able to showcase your model properly, none of those things are going to matter. Although I'thou training myself in this area, lighting is still my weakest link. If you're like me and blank during the lighting procedure, I have a lighting setup for you which works great for portrait presentation.
Presentation
Null is perfect in existent life. Calculation imperfections helps sell the believability of your character. For this project, I wanted a vignette effect and to rotate my camera in the Z centrality by ii-3 degrees to brand it look straight after by manually moving it.
Calculation Flower and Depth of Field can as well add realism to your scene, while Chromatic Aberration can mimic the event of a camera shot. Fog tin can be added to requite the viewport space a sense of depth. Whatever you exercise, brand sure it's washed with taste and compliments your piece rather than take away from it.
Tip: Renders will look unlike across multiple screens. My monitors take unlike colors and my renders mostly look different on each screen. Changing the Tone Mapping setting to Filmic and tweaking the Exposure to a value of 2.ii is by and large a proficient point for my renders to wait decent on a broad variety of monitors .
Thanks to the people at Marmoset for giving me the opportunity to write this article. Thanks to the people who read it and made information technology this far since the commodity is much longer than what I wanted information technology to exist. I promise it helps 🙂
You lot can check out more than of Saurabh's work on Artstation and learn more most Toolbag three's peel shader in Episode 6 of Getting to Know Toolbag three.

Source: https://marmoset.co/posts/creating-realistic-skin-toolbag-saurabh-jethani/
Posted by: gallimakered1994.blogspot.com
0 Response to "How To Make Skin Realistic"
Post a Comment